こんばんは、ritouです。
今回のY!Jの新機能は気のせいじゃなさそうだ!
ということで、今回のエントリは長いので気をつけてください。
何が起こった
ここにいろいろ書いてあります。
http://developer.yahoo.co.jp/yconnect/
- 名称はYConnect
- OAuth 2.0の仕様に準拠した
- OpenID Connectもサポート
"準拠"と"サポート"の使い分けが気になりますがまぁ進めましょう。
OAuth 2.0
YConnectでは2種類のClientからの利用を想定しています。
- サーバーサイド
- クライアントサイド
それぞれConfidential/PublicなClientのことですね。
早速登録してみました。
誰かも言ってましたが、redirect_uriの設定はいったん登録した後に編集しないといけないという仕様のようです。
まずは、サーバーサイドアプリでAuthorization Requestを送ってみましょう。
いわゆるAuthorization Code Grantです。オークション関連の機能を使うと設定しておいて、scopeの値はoptionalだったので省略しました。
https://auth.login.yahoo.co.jp/yconnect/v1/authorization?
response_type=code&
client_id=(client_id)&
redirect_uri=(redirect_uri)&
state=hoge
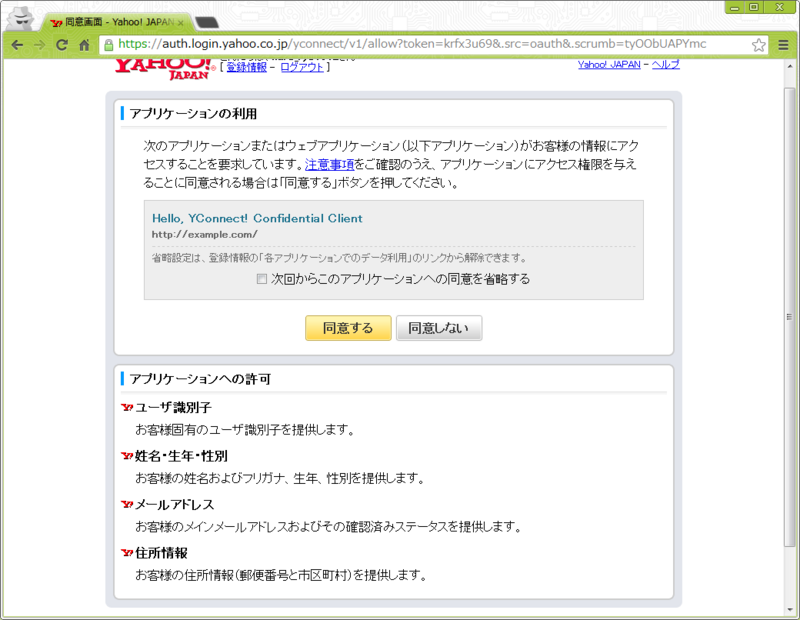
同意画面が出てきて、先に進めてAuthorization Responseを見ます。
http://localhost/redirect_uri?
code=(code)&
state=hoge
クエリパラメータにcode,stateの値が。いい感じです。
Access Token Responseを見てみましょう。
{
 "access_token":"(Access Token)",
 "token_type":"bearer",
 "expires_in":"3600",
 "refresh_token":"(Refresh Token)"
}
問題ないですね。
細かいところで、Client Authentication(client_id, client_secretの指定方法)にはBasic Authのみ対応しているようです。
仕様では"POSTに指定させるのはMUSTではなくMAY"ですから問題ありません。
しかし、Authorization Codeに空を指定してみます。
{
 "error":"invalid_request",
 "error_description":"token is invalid.",
 "error_code":"104"
}
このエラーは"invalid_grant"にすべきですね。
では、あえてImplicit Grantのリクエストを送ってみます。
http://localhost/redirect_uri?
error=unauthorized_client&
error_description=cannot+use+implicit+flow.&
error_code=1004&
state=hoge
おー、許可されてない。
個人的にはimplicit flowって書いてあるところがImplicit Grant Flowのほうが良い気がしますが気にしないでください。
次にクライアントサイドアプリを試してみましょう。
Implicit GrantのAuthorization Requestがこちらです。
https://auth.login.yahoo.co.jp/yconnect/v1/authorization?
response_type=token&
client_id=(client_id)&
redirect_uri=(redirect_uri)&
state=hoge
Authorization Responseを見てみます。
http://localhost/redirect_uri#
access_token=(Access Token)&
token_type=bearer&
expires_in=3600&
state=hoge
フラグメントにちゃんとついてます。
次に、クライアントサイドでAuthorization Code Grant使ってみましょう。
Authorization Responseはちゃんと帰ってきました。
http://localhost/redirect_uri?
code=(code)&
state=hoge
これでsecretなしでAccess Token取得しましょう。
ここではPOSTにclient_idを指定します。
まぁ、いろいろと考えがあるのでしょう。
{
 "access_token":"(Access Token)",
 "token_type":"bearer",
 "expires_in":"3600",
 "refresh_token":"(Refresh Token)"
}ちゃんとAccess TokenもRefresh Tokenも渡されてきました。
ここまででOAuth 2.0の検証は終わりですね。
OAuth 2.0対応まとめ
- Confidential/Public Clientに対応
- Public Clientにはclient_secret発行しない
- Public ClientにもAuthorization Code Grantを提供
- カスタムURIスキームも利用可能
検証では触れませんでしたが、カスタムURIスキームについては慎重な扱いが求められるのかなと思っています。iOS/Androidアプリを開発されている方であればわかるかもしれませんが、値が重複したり、どっちが優先になったりなど気になることが多いです。
クライアントサイドアプリについて、カスタムURIスキームを用いたレスポンス詐取の可能性には注意を払う必要がありそうです。
OpenID Connect
ではでは、OpenID Connectへの対応を見てみます。
たくさん仕様がある中で、下記の仕様に対応したと思われます。
- Draft: OpenID Connect Basic Client Implementer's Guide 1.0 - draft 38
- Draft: OpenID Connect Implicit Client Implementer's Guide 1.0 - draft 21
これらは、それぞれOAuth 2.0のImplicit, Authorization Code Grantの認証イベントのやりとりを拡張したものです。
詳しくはこちらに書いてあります。
「OpenID Connect」を理解する (2/2):デジタル・アイデンティティ技術最新動向(4) - @IT
まずは、サーバーサイドアプリのほうでBasic Client Profileに従ったリクエストを送ってみましょう。
https://auth.login.yahoo.co.jp/yconnect/v1/authorization?response_type=code&
client_id=(client_id)&
redirect_uri=http://localhost/redirect_uri&
scope=openid%20profile%20email%20address&
state=hoge
OpenID Connectのユーザー情報らしき値を要求しています。
OpenID 2.0のAXのときは渡す属性情報をユーザーが外せましたがConnectでは外せませんね。
(この話はConnectの仕様とは関係ありません。)
OAuth 2.0のscopeの処理なので難しかったのかな。ちょっと残念です。
Authorization ResponseにはAuthorization Codeがついてきます。
http://localhost/redirect_uri?
code=(code)&
state=hoge
戻ってきたAuthorization CodeからAccess Tokenを取得します。
{
 "access_token":"(Access Token)",
 "token_type":"bearer",
 "expires_in":"3600",
 "refresh_token":"(Refresh Token)"
}Connectの仕様ではscopeにopenidの値が必須であり、Access TokenレスポンスにもID Tokenが必須になります。
よって、私の解釈ではscopeにopenidが含まれたらAccess TokenレスポンスにID Tokenが含まれてほしいところです。
次にresponse_typeにcode id_tokenを指定します。
https://auth.login.yahoo.co.jp/yconnect/v1/authorization?
response_type=code id_token&
client_id=(client_id)&
redirect_uri=http://localhost/redirect_uri&
scope=openid%20profile%20email%20address&
state=hoge&
nonce=hage
Authorization Responseを見てみます。
http://localhost/redirect_uri?
code=(code)&
state=hoge
あれ、response_type=codeの場合と同じですね。
Access Tokenを取得してみます。
{
 "access_token":"(Access Token)",
 "token_type":"bearer",
 "expires_in":"3600",
 "refresh_token":"(Refresh Token)"
 "id_token":"(ID Token)"
}
なるほど。ここでID Tokenついてくるのか。んー。
response_typeに複数の値が指定されたときの仕様はこちらになります。
Final: OAuth 2.0 Multiple Response Type Encoding Practices
response_type=code id_tokenの場合、レスポンスはフラグメントで返される必要があります。
5. Registration of Some Multiple-Valued Response Type Combinations
This section registers combinations of the values code, token, and id_token, which are each individually registered response types.
code token
When supplied as the value for the response_type parameter, a successful response MUST include both an Access Token and an Authorization Code as defined in the OAuth 2.0 specification. Both successful and error responses SHOULD be fragment-encoded.
code id_token
When supplied as the value for the response_type parameter, a successful response MUST include both an Authorization Code as well as an id_token. Both success and error responses SHOULD be fragment-encoded.
id_token token
When supplied as the value for the response_type parameter, a successful response MUST include both an Access Token as well as an id_token. Both success and error responses SHOULD be fragment-encoded.
code id_token token
When supplied as the value for the response_type parameter, a successful response MUST include an Authorization Code, an id_token, and an Access Token. Both success and error responses SHOULD be fragment-encoded.
つまり、code以外全部フラグメントです。覚えておきましょう。
次にクライアントサイドアプリも見てみましょう。
response_type=id_token tokenを指定します。
http://localhost/redirect_uri#
access_token=(Access Token)&
token_type=bearer&
expires_in=3600&
state=hoge&
id_token=(ID Token)
フラグメントにID Tokenも含まれています。正しいですね。
あと、ID Token検証エンドポイントというのがあります。
これは最初のころにOpenID Connectの仕様に入っていたものです。
結構便利なので個人的にはアリだと思います。
最後に一点だけ、重箱なんとかレベルですが、現状のID TokenではAuthorization ResponseのAccess Tokenのみを置き換えられた場合に気づくことができません。
Connectの仕様には、response_type=token id_tokenの場合、ともに返されるAccess Tokenのハッシュ値(を半分にしてBase64したもの)をID Tokenに含めるようになっています。
at_hash
Draft: OpenID Connect Implicit Client Implementer's Guide 1.0 - draft 21
If the ID Token is issued with an access_token in an implicit flow, this is REQUIRED. The value is produced by base64url encoding the left-most half of the hash created by hashing the access_token with the SHA-2 family hash algorithm of the same length as the hash used in the alg parameter of the JWS [JWS] header. For instance, if the alg is HS256, hash access_token with SHA-256, then take the left-most 128 bits and base64url encode them.
ちなみにresponse_type=code id_tokenの場合はc_hashとなります。
この値と手元にあるAccess Tokenの値を比較することで、ID TokenとAccess Tokenが共にレスポンスに含まれたことを検証することができます。
クライアントサイドアプリの場合は、独自仕様でCheckTokenエンドポイントでAccess Tokenと共にID Tokenを受け取り、この判定をしてあげても良いのではないでしょうか。
もしY!JさんがPHPによる実装であればこの辺りにありますので参考にしてもらえればと思います。
php-Akita_OpenIDConnect/IDToken.php at master · ritou/php-Akita_OpenIDConnect · GitHub
OpenID Connect対応まとめ
- Basic Client Profile, Implicit Client Profileに対応したと思われる
- ID Tokenの検証用APIを提供
- サーバサイドアプリはresponse_typeとscope、ID Tokenの扱いが少し仕様とずれている
- response_type=token id_tokenの場合はID Tokenの中にat_hashを含むと検証に使える
こんな感じでしょうか。
ぜひとも国内のOpenID Connect実装の人柱(サービス柱?)となってInterop参加してる私たちのようなこまけぇ人間からBB弾を浴びながら突き進んでいただければと思います。
長くなりました。
ではまた!

